Designing and Building Enterprise DMZs

In this section, we cover the basic configuration steps needed to set up the PIX/ASA to provide internal user access to the Internet, support for a DMZ, and connectivity to the Internet. Here we discuss how to define interfaces, configure NAT, set access rules, and enable routing. By the end of this section, you will be familiar with the basic configuration steps for the PIX/ASA and be able to apply these steps to the configuration of your PIX/ASA firewall.
Before configuring the interfaces on the PIX/ASA, you must have your design laid out and know the function of each PIX/ASA interface.This process includes:
Naming the interface
Assigning a security level
Configuring an IP address
Setting the speed and duplex of the interface
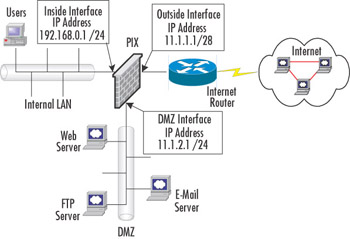
The commands required to perform these tasks differ based on whether the firewall is running the 6. x or 7. x version of the OS. We will first look at the 6. x OS commands, then the 7. x OS commands. Figure 6.11 shows a design for a traditional three-legged firewall, detailing the number of interfaces and their IP addresses required to implement this environment.The switches connecting the PIX/ASA to the inside, outside, and DMZ LANs are all capable of running at 100Mbps full duplex. Once the basic information has been compiled, we can begin to add the configuration needed to set up the interfaces on the PIX/ASA.
In configuring the interface, the...