Developing .NET Web Services with XML

Write higher-level applications in less time using this hands-on guide, and learn the interrelated Web Services involved with .NET and XML.
syngress.com Now that you have the back-end database system in place, you can go about implementing the actual Web Service that clients will be calling. Of course, you will want to do this work in Visual Studio.NET. Note that you can find the complete code for this project on the Solutions Web site for the book (www.syngress.com/solutions).
Start the setup of the Visual Studio project by creating a new ASP.NET Web Service project, called jokesService. Go to File New Project, choose the entry ASP.NET Web Service under the Visual C# Projects folder, keep the default Location, and enter jokesService as the Name of the project (Figure 8.7).
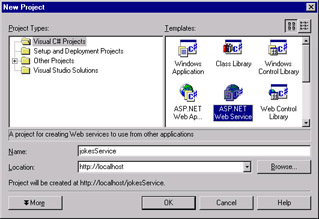
This will set up a new virtual directory of the same name, configure the necessary FrontPage server extensions, define an assembly, and create supporting project files.
Rather annoyingly, the ASP.NET Web Service wizard creates a default Web Service called Service1, which you may want to remove from the project right away (or rename it later when we go about adding Web Services to our project).
Next, check on the database we created earlier: Click on Server Explorer, which by default is on the upper left hand corner of the window. Right click under Data Connections, and enter the connection information for the .NET SDK database as follows: Under Server enter (local)\NetSDK, the user name...