Applied CATIA V.5 R15

Providing step-by-step instruction with numerous illustrations, this book offers a self-guided learning experience for users to learn CATIA V.5 R15 on their own with little or no outside help.
Objectives:
Learn to import existing solid models into the Assembly Design Workbench
Learn to constrain all parts in the Assembly Design Workbench
Learn to edit/modify parts while in the Assembly Design Workbench
Learn to manually simulate motion using the cursor
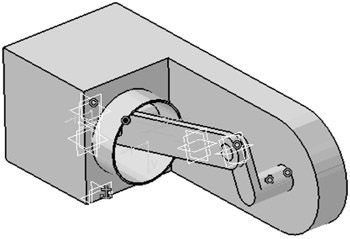
Chapter 7 includes instruction on how to construct the assembly shown below.
Start CATIA by referring to "Chapter 1 Getting Started".
After CATIA s running, move the cursor to the upper left portion of the screen and left click on Start. A drop down menu will appear. Left click on Mechanical Design. Another drop down menu will appear. Left click on Assembly Design as shown in Figure 1.
NOTE: Up to this point, most computers can work in the Sketcher Workbench, Part Design Workbench and Drafting Workbench with little problem. Working in the Assembly Design Workbench requires substantially more computer "horsepower". Your computer may run considerably slower than in previous chapters. Allow extra time for selecting of menus, highlighting surfaces, edges, etc. If commands or instruction appear NOT to be working, more time needs to be allotted between operations for moving parts around, selecting icons and tools.
The Assembly Design Workbench will open. Your screen should look similar to Figure 2.
Move the cursor to the upper left portion of the screen and left click on Insert. A drop down menu will appear. Left click on Existing Component as shown in Figure 3.
Move the cursor to the upper left portion of the screen and...