Planning Using Primavera Project Planner P3, Version 3.1: Including Updated Workshops
7 Formatting the Display

Overview

You should set up the on-screen presentation so the schedule is easy to read and consistent.

P3 has many good facilities for presenting your information.

This chapter covers the following topics:

  • Toolbar

  • Columns

  • Formatting Bars

  • Formatting Summary Bars

  • Formatting Individual Bars

  • Screen Colors

  • Timescale

  • Sightlines

  • Row Height

  • Fonts

  • Dates

  • Language

  • Thousands Separator and

  • Splitting the Screen.

7.1 The Toolbar

Many functions in P3 may be accessed through the toolbar. There may be some icons shown in this chapter that are not available on your toolbar, so we will start by showing you how to display and format the toolbar.

Select View, Toolbar to hide the toolbar when displayed and to display the toolbar when it is hidden.

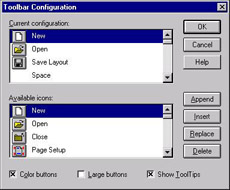
Toolbar icons may be added or deleted by selecting Tools, Options, Toolbar:

  • To add Icons:

    • select the position you require the icon from the top window

    • select the icon you wish to add from the Available icons window at the bottom.

    • click Append to add the icon at the end of the toolbar or

    • select the location in the upper window to place the icon, the new icon will be inserted above the highlighted icon, select Insert to insert or Replace to replace the highlighted icon.

  • To delete an icon, select it in the upper box and click on Delete.

  • Color buttons enables the icons to be displayed in color or monochrome.

  • Large buttons displays large or small buttons.

UNLIMITED FREE
ACCESS
TO THE WORLD'S BEST IDEAS

SUBMIT
Already a GlobalSpec user? Log in.

This is embarrasing...

An error occurred while processing the form. Please try again in a few minutes.

Customize Your GlobalSpec Experience

Category: Computer Mice and Pointing Devices
Finish!
Privacy Policy

This is embarrasing...

An error occurred while processing the form. Please try again in a few minutes.