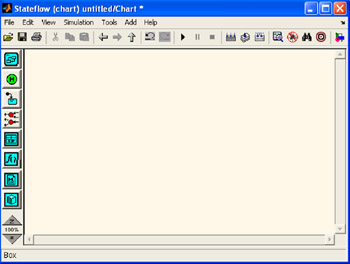
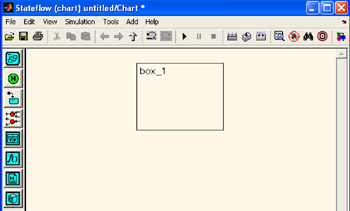
Introduction to Stateflow with Applications

Chapter 8: Boxes in Stateflow

This is a short chapter describing the use of boxes to extend Stateflow Chart diagrams. We describe how to create a state and changing it to a box, and how to create a box and change it to a state.

8.1 Creating a Box

Boxes offer a convenience for organizing related items in our charts. We create a box by using the Box tool in the Stateflow Editor window shown in Figure 8.1.


Figure 8.1: The Stateflow Editor window with the mouse pointer near the Box tool

To create a Box we use the following steps:

  1. We select the Box tool.

  2. We move the cursor into the drawing area. In the drawing area, the mouse cursor becomes box-shaped, and we click in a desired location to create a box.

  3. The created box appears with a question mark (?) name in its upper left-hand corner, we click the question mark label, and a text cursor appears in place of the question mark.

  4. We enter a name for the box and click outside of the box when finished. A typical box appears as shown in Figure 8.2.


Figure 8.2: A created box

To delete a box, we click it to select it and we press the Delete key, or we choose Cut ( Ctrl+ X) from the Edit menu.

8.2 Changing a State to a Box

We can change an existing state to a box and back to a state with the following procedure:

  1. We...

UNLIMITED FREE
ACCESS
TO THE WORLD'S BEST IDEAS

SUBMIT
Already a GlobalSpec user? Log in.

This is embarrasing...

An error occurred while processing the form. Please try again in a few minutes.

Customize Your GlobalSpec Experience

Category: Packaging Design Services
Finish!
Privacy Policy

This is embarrasing...

An error occurred while processing the form. Please try again in a few minutes.