Photoshop CS3 for Forensics Professionals: A Complete Digital Imaging Course for Investigators
Chapter 15: Precise Image Sizing

Overview

Printing images at an exact size is a common requirement in forensics. Here are just some examples:

  • Printing enhanced fingerprints for AFIS entry

  • Printing footwear or tire impression images for comparison

  • Taking measurements in blood spatter images

The method you will use to make your images exactly 1:1 (or any exact size) in Photoshop is relatively easy but not very intuitive. This chapter will step through the process for making an image 1:1, 3:1, or any other exact size.

Viewing Images at the Proper Magnification

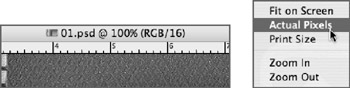
When you're doing any critical work, it is essential that the image is displayed at a screen magnification that will not introduce any frequency interference, such as 50, 100, or 200 percent. The magnification amount can be viewed in the image title bar (Figure 15.1).


Figure 15.1: On the left is the image title bar showing the image magnification. On the right is the contextual menu for the Zoom tool.

If the image is not displayed at 100 percent, zoom into it to view at 100 percent (or a factor or multiple of 100). A quick way to display an image at 100 percent is to select the Zoom tool, right-click/Control-click, and choose Actual Pixels from the contextual menu. Or, simply click with the Zoom tool to increase the magnification, and Alt/Option+click to reduce the magnification.

Verify that Photoshop's rulers are visible on the top and left sides of the image (Figure 15.2). If the rulers are not visible, choose View > Rulers or...

UNLIMITED FREE
ACCESS
TO THE WORLD'S BEST IDEAS

SUBMIT
Already a GlobalSpec user? Log in.

This is embarrasing...

An error occurred while processing the form. Please try again in a few minutes.

Customize Your GlobalSpec Experience

Category: Magnifiers
Finish!
Privacy Policy

This is embarrasing...

An error occurred while processing the form. Please try again in a few minutes.