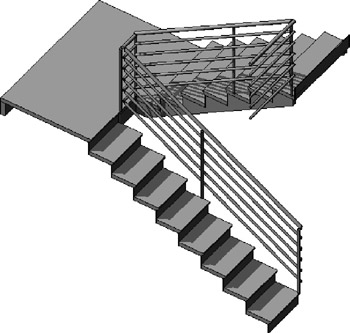
Introducing Revit Architecture 2009

Stairs and Railings

Most buildings have stairs, and where there is a stair, you're likely to encounter a railing. Revit provides specially designed tools for the creation of stairs and railings that give you control over their basic constructive parts. With stairs, you set up design rules for elements such as stringers, treads, and risers; then Revit goes to work building the 3D geometry for you. The same is true for railings. Using design rules, you establish a pattern of rails and balusters and then draw a simple 2D path. Revit fills in the path with 3D geometry based on the rules you establish. Figure 4.16 shows a typical Revit stair.


Figure 4.16: A stair

The Stair and Railing tools are located in the Modeling tab of the Design bar. When you activate these tools, you enter a special Sketch mode where you sketch 2D lines. The lines used to construct stairs define the boundary and the risers. When you finish, Revit builds the 3D geometry for you. Changing the appearance and design rules for stairs and railings is done through the Element Type Properties dialog box.

Stairs can be set to be multistory, so that if your building is a six-story building out of which five have the same floor-to-floor height, you can draw the stair and the railing once and have it automatically repeat through multiple levels. This is an instance property of any stair (see Figure 4.17). If the stair is drawn with a railing,...

UNLIMITED FREE
ACCESS
TO THE WORLD'S BEST IDEAS

SUBMIT
Already a GlobalSpec user? Log in.

This is embarrasing...

An error occurred while processing the form. Please try again in a few minutes.

Customize Your GlobalSpec Experience

Category: Stairs and Stairways
Finish!
Privacy Policy

This is embarrasing...

An error occurred while processing the form. Please try again in a few minutes.