Learning and Applying Autodesk Inventor 2008 Step-by-Step

Chapter 6: Advanced Design Procedures

Objectives:

  • Design multiple sketch parts

  • Learn to use the X, Y, and Z Planes

  • Learn to use the Wireframe viewing command

  • Learn to project geometry to a new sketch

  • Learn to use the Shell command

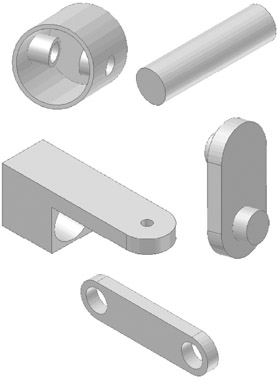
Chapter 6 includes instruction on how to design the parts shown below.

  1. Start Autodesk Inventor 2008 by referring to "Chapter 1 Getting Started".

  2. After Autodesk Inventor 2008 is running, begin a new sketch.

  3. Move the cursor to the upper left corner of the screen and left click on Center Point Circle as shown in Figure 1.

  4. Move the cursor to the center of the screen and left click once. This will be the center of the circle as shown in Figure 2.

  5. Move the cursor to the right and left click once as shown in Figure 3.

  6. Move the cursor to the middle left portion of the screen and left click on General Dimension as shown in Figure 4.

  7. After selecting General Dimension move the cursor over the edge of the circle. It will turn red. Left click once. The dimension will be attached to the cursor as shown in Figure 5.

  8. Move the cursor down. The actual dimension of the line will appear as shown in Figure 6.

  9. Move the cursor to where the dimension will be placed and left click once. While the dimension is still in red, left click once. The Edit Dimension dialog box will appear as shown in Figure 7.

  10. To edit the dimension, type 2.00

UNLIMITED FREE
ACCESS
TO THE WORLD'S BEST IDEAS

SUBMIT
Already a GlobalSpec user? Log in.

This is embarrasing...

An error occurred while processing the form. Please try again in a few minutes.

Customize Your GlobalSpec Experience

Category: Computer Mice and Pointing Devices
Finish!
Privacy Policy

This is embarrasing...

An error occurred while processing the form. Please try again in a few minutes.