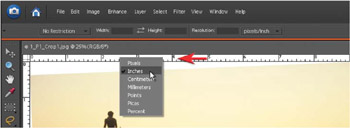
Adobe Photoshop Elements 6 Maximum Performance: Unleash the Hidden Performance of Elements

Part 1: Optimize

Chapter List

Project 1: Crop and Correct
Project 2: Levels
Project 3: Camera Raw
Project 4: Target Tones
Project 5: Contrast
Project 6: Hue and Saturation
Project 7: Sharpening
Project 8: Printing

Overview

This simple project will unmask some of the hidden features of the Straighten and Crop tools, enabling you to optimize your images for print or screen viewing. You will learn that you can straighten, resize and crop your image with just a few clicks, and that the Free Transform command can correct any unnatural perspective resulting from using wide-angle lenses. Quality starts here.


Ensure the horizon lines of your images do not resemble ski slopes by making use of the fabulous Straighten tool

1. Open the image from the supporting DVD in the Standard Edit workspace. Click on the Straighten tool in the Tools palette. Select the option Grow or Shrink Canvas to Fit in the Options bar above the image window. Now click on the horizon line and, with the mouse button held down, drag a line along the horizon line of the image. The image will automatically be straightened.

2 . Select the Crop tool in the Tools palette and view the options in the Options bar. When we size an image we should select the width and height in pixels for screen or web viewing, and in centimeters or inches for printing. Typing in px , in or cm after each measurement will tell Photoshop Elements to crop using these units. If...

UNLIMITED FREE ACCESS TO THE WORLD'S BEST IDEAS

SUBMIT
Already a GlobalSpec user? Log in.

This is embarrasing...

An error occurred while processing the form. Please try again in a few minutes.

Customize Your GlobalSpec Experience

Category: Sprayers and Spray Coating Equipment
Finish!
Privacy Policy

This is embarrasing...

An error occurred while processing the form. Please try again in a few minutes.