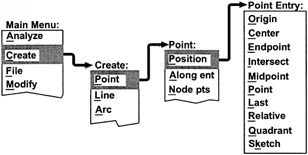
Learning Mastercam Mill Step by Step

Chapter 2: CreatingG 2D Geometry

2-1 Chapter Objectives

After completing this chapter you will be able to:

  1. Know how to construct basic 2D geometric entities such as points, lines, arcs, fillets and splines.

  2. Execute rectangle, chamfer and letter constructions in 2D space.

  3. Know how to construct 2D ellipse and polygon geometric entities.

  4. Understand how to use Mastercam's point positioning commands to quickly and accurately locate points on existing geometric entities.

  5. Explain how to pan and zoom screen displays.

  6. State the methods used for repainting and regenerating the screen displays.

2-2 Generating the CAD Model of a Part

The first step in generating toolpaths and the part program in Mastercam is to create the part's geometry using software's CAD package.

2-3 Point Constructions in 2D Space

On CD

A point is displayed on the screen as the symbol ( ) .Points can be used as references to specify locations for subsequent geometric constructions involving lines, circles, arcs, splines, etc

Creating Points-1

Note

For rectangular coordinates, Mastercam employs the Cartesian coordinate system for specifying the location of a point in space. This system consists of three directional lines, called axes, that mutually intersect at an angle of 90 . The point of intersection is called the origin. The XY coordinate plane is broken up into four quadrants. The location of a point is determined by first entering its x-distance, then y-distance and finally z-distance from the origin.

Origin

A point is created at the CAD screen

UNLIMITED FREE
ACCESS
TO THE WORLD'S BEST IDEAS

SUBMIT
Already a GlobalSpec user? Log in.

This is embarrasing...

An error occurred while processing the form. Please try again in a few minutes.

Customize Your GlobalSpec Experience

Category: Mesh Generators
Finish!
Privacy Policy

This is embarrasing...

An error occurred while processing the form. Please try again in a few minutes.