Learning Mastercam Mill Step by Step

5-7: Views, Panning and Sectioning Within the Machining Verifier

5-7 Views, Panning and Sectioning Within the Machining Verifier

A) VEIWING THE MACHINING VERIFICATION IN SELECTED VIEWS

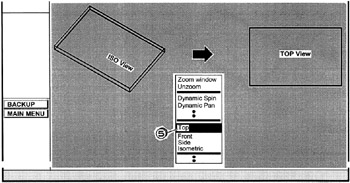
The operator can view the machining verification in either the Top, Front, Right or Isometric view. The view orientation must be selected prior to starting the machining animation.

Example 5-5:

Direct Mastercam to show the verification with the model orientated in the top view.

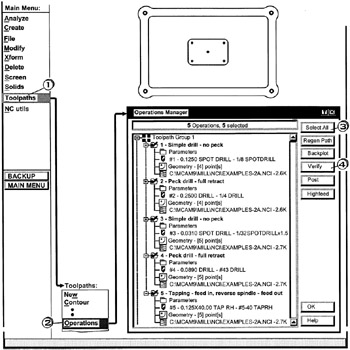
  • Click [1] Toolpaths

  • Click [2] Operations

  • Click [3] the Select All button

  • Click [4] the Verify button

  • Right Click; move the mouse cursor to Top and Click [5] the verification can then be observed in the Top view

B) DYNAMICALLY PANNING THE MACHINED MODEL

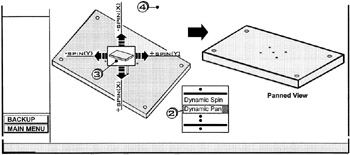
Use the Pan option to dynamically rotate the machined model within the verifier.

Example 5-6:

Dynamically pan machined model as shown below

  • Right Click [1];move the mouse cursor and [2] and click

    Pick a point to begin dynamics

  • Click [3] and drag the mouse cursor right and left (Y-spinning) or up and down (X-spinning)

  • Click [4] to set the rotation and exit

C) SECTIONING THE MACHINED MODEL

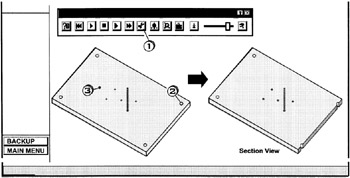
The machined model can be sectioned within the verifier.

Example 5-7:

Section the machined model shown below

  • Click [1] on the Cut Section button

    Pick point on stock for section reference

  • Click [2] near the hole center

    Pick side of stock to keep

  • Click [3] the portion to remain

USING THE TOOLBAR MENU

Toolbar Menu Displayed when Mastercam is Started

UNLIMITED FREE
ACCESS
TO THE WORLD'S BEST IDEAS

SUBMIT
Already a GlobalSpec user? Log in.

This is embarrasing...

An error occurred while processing the form. Please try again in a few minutes.

Customize Your GlobalSpec Experience

Category: Computer Mice and Pointing Devices
Finish!
Privacy Policy

This is embarrasing...

An error occurred while processing the form. Please try again in a few minutes.