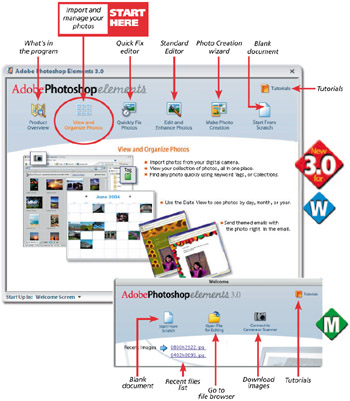
Adobe Photoshop Elements 3.0: A Visual Introduction to Digital Imaging

Chapter 3: First Steps

Overview

As a simple introduction to the program, this chapter will take you through the first basic steps involved in digital photography from downloading your pictures from your camera to the computer to holding an enhanced print in your hand.

We won't get involved in any manual or complex editing or enhancement techniques, there will be plenty of time for these in the next couple of chapters, instead we will look at the various ways that you can get your images from your camera or scanner into the program and see how you can manage the pictures once they are there. Then we will select an individual photograph, rotate and crop the image, save the changed file and finally print the picture. So let's get started.

The Welcome Screen

When Elements is first opened, the user is presented with a Welcome screen containing several options. See Figure 3.1. The selections are broken into different types of imaging activities and depending on where you are in the workflow, will determine your entry point into the program. So to start let's overview the options in the Welcome screen.


Figure 3.1: The Elements Welcome screen appears as the user opens the program. The screen can also be displayed by selecting Window > Welcome from the menu bar of the Standard and Quick Fix editors as well as the Photo Browser. A different welcome screen with fewer options is available for Macintosh users.

Product Overview This selection provides you with a description...

UNLIMITED FREE
ACCESS
TO THE WORLD'S BEST IDEAS

SUBMIT
Already a GlobalSpec user? Log in.

This is embarrasing...

An error occurred while processing the form. Please try again in a few minutes.

Customize Your GlobalSpec Experience

Category: Touch Screen Displays
Finish!
Privacy Policy

This is embarrasing...

An error occurred while processing the form. Please try again in a few minutes.