Animating with Microstation
For architects and engineers who deal with 3D rendering and animations, this text covers every aspect of animating in detail, including cameras, paths, actors, motion blurs, global and source lighting, and targets.
Now that you have successfully completed a script, you will be given an overview of how to record the animation frames to disk using the Record Script dialog box. The Record Script dialog box contains many options for recording animation scripts. Here you set the frame size or resolution and the type of output you need, among other settings.
Continuing with Longbeach.dgn, from the Animation Producer dialog box, select File > Record Script.
The Record Script dialog box opens.
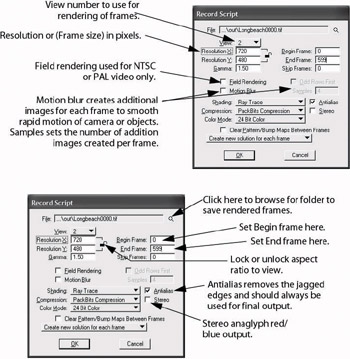
Enable Antialias by checking the box.
| Note | Antialias should always be used for the final output. The amount of antialiasing can be adjusted in the Ray Tracer settings dialog box. |
![]() Click the Record Image File tool in the upper right-hand corner of the Record Script dialog box.
Click the Record Image File tool in the upper right-hand corner of the Record Script dialog box.
The Record Script dialog box opens.
In the lower leftmost corner, click the List Files of Type button to display the list of available image formats.
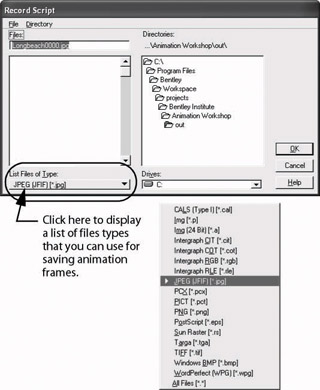
Set the file type to JPEG and click OK to return to the Record Script dialog box.
| Note | By default, the name will be the same as that of the design file and will begin with the frame number set by the Begin Frame option. In this case, the name is Longbeach000.jpg. If this were final output for an actual project, it is recommend that you use either TIFF of Targa as the file format. These formats take up considerably more disk space but they are non-compressed and... |