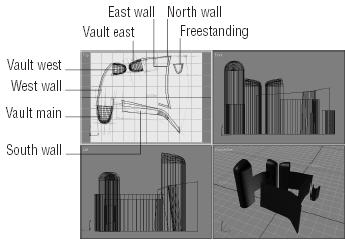
Mastering Autodesk VIZ 2005

Chapter 5: Organizing and Editing Objects

Overview

In the previous chapter, you began to build a fairly complex model. To continue working on that building, you'll need to employ some organizational tools, just to be able to see your work clearly.

In this chapter, you'll continue work on the Chapel at Ronchamp model. You'll be introduced to the Loft compound object that allows you to extrude a shape along a path to form complex forms. You'll also learn more ways to create and edit extruded spline shapes. Along the way, you'll learn how to organize your work through the use of object names and layers.

Naming Objects

Perhaps one of the simplest and most important things you can do to help keep your model organized is to give objects in your model meaningful names. You were introduced to this concept in Chapter 2. Let's go ahead and name all of the parts of the Chapel at Ronchamp project in preparation for creating the roof.

  1. On the CD Open the chapel model in VIZ. You may also use the ch05a.max file from the companion CD.

  2. If only one viewport is visible, click the Min/Max Toggle tool.

  3. Click the Zoom Extents All tool to get a view of all of the parts of your model.

  4. In the Top viewport, use the Select Object tool to select the south wall, as shown in Figure 5.1.


    Figure 5.1: Selecting walls in the Top viewport

  5. In the Name and Color rollout of...

UNLIMITED FREE
ACCESS
TO THE WORLD'S BEST IDEAS

SUBMIT
Already a GlobalSpec user? Log in.

This is embarrasing...

An error occurred while processing the form. Please try again in a few minutes.

Customize Your GlobalSpec Experience

Category: Additive Manufacturing Software
Finish!
Privacy Policy

This is embarrasing...

An error occurred while processing the form. Please try again in a few minutes.