Rendering with MicroStation
Through illustrations and hands-on exercises, this book covers every aspect of rendering in detail, including cameras, materials, lighting, environment maps, and rendering settings.
 TABLE OF CONTENTS
 In an earlier exercise, you saw the effect of having fog defined for a view. Here, you will learn more about controlling both fog and depth cueing.
In the next exercise, you will see how easy it is to control both fog and depth cueing by changing the front and back clipping planes of the view.
Open BC1 distance cue.dgn.
Open the Rendering Settings dialog box: Settings > Rendering > General. If necessary, set the following:
Near Distance: 0.20
Near Density: 0.00
Far Density: 0.65
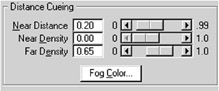
You will be using the row of red construction lines in the Top view as reference markers to set the display depth. By using these reference points, you will be setting each view's display depth to progressively shorten the depth of the camera for Views 3, 5, and 6. This moves the Far Density (back clipping plane) and greatly affects the rendered result. Initially, you will see all the street lights and trees.
Then, as you progressively move the back clipping plane toward the camera, the farthest street lights and trees will be left in the fog.
 Ray trace View 2.
The rendered view appears to get more foggy the deeper into it you look. Because the back clipping plane is set beyond the most distant street lights and trees, you can still see...