How to Cheat in 3ds Max 2009: Get Spectacular Results Fast

Background Maps

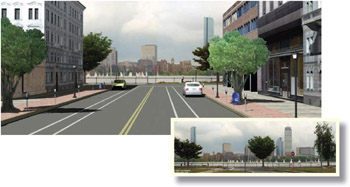
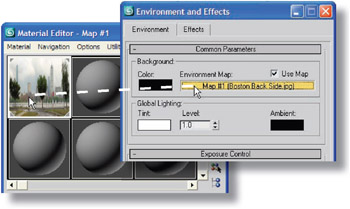
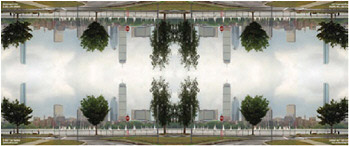
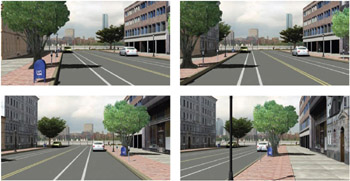
Your renderings can get a lot of mileage out of a photograph used as a background. The bitmap can be shifted or tiled within 3ds Max to match your camera s perspective.


Figure 1: To set up the background for the rendering, choose Rendering > Environment, click the blank Environment Map button, and choose a Bitmap. You won t see the bitmap in viewports; you need to render to see the background.

Figure 2: To display the background in a viewport, activate a camera or Perspective viewport and choose Views > Viewport Background. Turn on the Use Environment Background and Display Background options and click OK. If the image s aspect ratio differs from the viewport s, the image will appear squashed.

Figure 3: Open the Material Editor. Drag from the Environment Map button in the Environment and Effects dialog to an empty material slot. When asked to choose the copy method, choose Instance. This will enable you to change the background map from within the Material Editor.

Figure 4: Select the background image slot in the Material Editor. Experiment with the Offset and Tiling values to eliminate stretching, or to make the parts you want to see show up in the viewport and rendering. You can also change the Mapping to Cylindrical or Spherical Environment, or use the Mirror option to get more sky at the top and trees at the sides.

Figure 5: In the Coordinates rollout, the mapping type is set to Environ by default. This means the background...

UNLIMITED FREE
ACCESS
TO THE WORLD'S BEST IDEAS

SUBMIT
Already a GlobalSpec user? Log in.

This is embarrasing...

An error occurred while processing the form. Please try again in a few minutes.

Customize Your GlobalSpec Experience

Category: 3D Scanners
Finish!
Privacy Policy

This is embarrasing...

An error occurred while processing the form. Please try again in a few minutes.