Exercise Workbook for Beginning AutoCAD 2005

Use this easy-to-follow, self-study guide to learn the basics of AutoCAD through step-by-step lessons and non-intimidating exercises.
 TABLE OF CONTENTS
 TYPING = A
PULLDOWNS = DRAW / ARC
TOOLBARS =DRAW 
There are 10 ways to draw an ARC in AutoCAD. Not all of the ARCS options are easy to create so you may find it is often easier to trim a Circle or use the Fillet command.
On the job, you will probably only use 2 of these methods. Which 2 depends on the application.
An ARC is a segment of a circle and must be less than 360 degrees.
Most ARCS are drawn counter-clockwise but you will notice in the examples on the following pages that some may be drawn clockwise by entering a negative input.
Examples of each of the ARC options are shown in EXERCISES 22A through 22C. Also, refer to the "Help" menu for additional examples of the use of the Arc command.
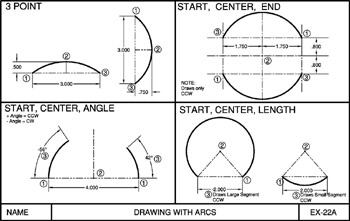
INSTRUCTIONS:
Draw the ARCS above.
Select the method shown from the DRAW / ARC pulldown menu.
| Note | Yours may not appear exactly as the example that's OK. |
Save as: EX-22A.
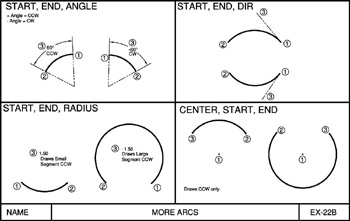
INSTRUCTIONS:
Draw the ARCS above. Select the method shown.
Select the method shown from the DRAW / ARC pulldown menu.
| Note | Yours may not appear exactly as the example that's OK. |
Save as: EX-22B.
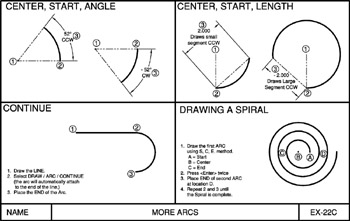
INSTRUCTIONS:
Draw the ARCS above. Select the method shown.
Select the method shown from the DRAW / ARC pulldown menu.
| Note | Yours may not appear exactly as the example that's OK. |
Save as: EX-22C.