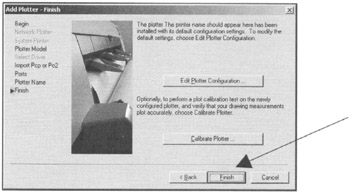
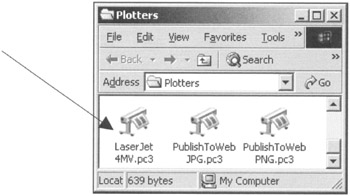
Exercise Workbook for Advanced AutoCAD 2005

Appendix A: Add a Printer/Plotter

The following are step by step instructions on how to configure AutoCAD for your printer or plotter. These instructions assume you are a single system user. If you are networked or need more detailed information, please refer to your AutoCAD users guide.

Note

You can configure AutoCAD for multiple printers. I suggest that you configure the plotter shown below to match the exercises in this workbook.

  1. Select File/Plotter Maneger

  2. Select Add-a-Plotter Wizard

  3. Select the Next button.

  4. Select My Computer the Next.

  5. Select the Manufacturer and the specific Model desired then Next.

    (If you have a disk with the specific driver information, put the disk in the disk drive and select Have disk button then follow instructions.)

  6. Select the Next box.

  7. Select Plot to a port and LPT1 unless your printer is attached to a Com port. Then select Next .

  8. The Printer name, that you previouly selected, should appear. Then select Next

  9. Select the Edit Plotter Configuration box.

  10. Select:

    1. Device and Document Settings tab.

    2. Media: Source and Size

    3. Size: Ansi B (11 17 inches)

    4. OK box.

  1. Select Finish .

  2. Now check the File/Plotter Manager. Is your printer/plotter there?

UNLIMITED FREE
ACCESS
TO THE WORLD'S BEST IDEAS

SUBMIT
Already a GlobalSpec user? Log in.

This is embarrasing...

An error occurred while processing the form. Please try again in a few minutes.

Customize Your GlobalSpec Experience

Category: Marking and Engraving Equipment
Finish!
Privacy Policy

This is embarrasing...

An error occurred while processing the form. Please try again in a few minutes.