Introduction to AutoCAD 2006 2D and 3D Design

Chapter 14: 3D Models in Viewports

Aim of this chapter

To give examples of 3D solid models constructed in multiple viewport settings.

Setting up viewport systems

One of the better methods of constructing 3D models is in different viewport settings. Working in viewport settings allows what is being constructed to be seen from a variety of viewing positions. To set up a new viewport system:

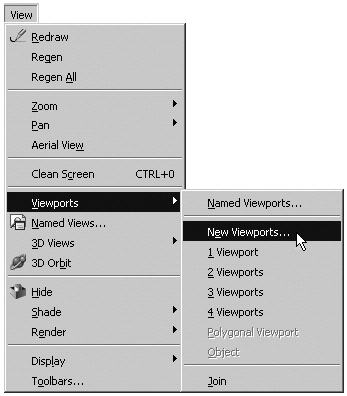
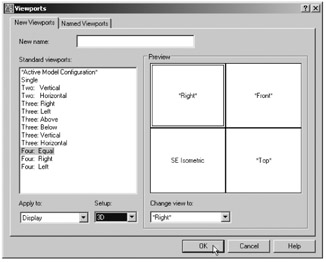
  1. Click View in the menu bar and from the drop-down menu which appears click Viewports and in the sub-menu which then appears click New Viewports ...(Fig. 14.1). The Viewports dialog appears (Fig. 14.2).


    Fig. 14.1: Selecting New Viewports . . . from the View drop-down menu


    Fig. 14.2: The Viewports dialog

  2. Click the New Viewports tab and a number of named viewports systems appear in the Standard viewports list in the dialog.

  3. Click the name Four: Equal, followed by a click on 3D in the Setup popup list. A preview of the Four: Equal viewports screen appears showing the views appearing in each of the four viewports.

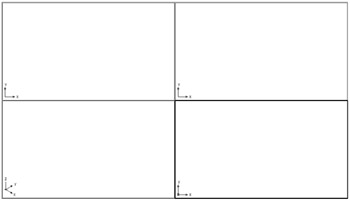
  4. Click the OK button of the dialog and the AutoCAD 2006 drawing area appears showing the four viewport layout (Fig. 14.3).


    Fig. 14.3: The Four: Equal viewports layout

First example Four: Equal viewports (Fig. 14.7)

Fig. 14.4 shows a first angle orthographic projection of a support. To construct a Scale 1:1 3D model of the support in a Four: Equal viewport setting:

UNLIMITED FREE
ACCESS
TO THE WORLD'S BEST IDEAS

SUBMIT
Already a GlobalSpec user? Log in.

This is embarrasing...

An error occurred while processing the form. Please try again in a few minutes.

Customize Your GlobalSpec Experience

Category: Vacuum Viewports and Access Doors
Finish!
Privacy Policy

This is embarrasing...

An error occurred while processing the form. Please try again in a few minutes.