Planning Using Primavera Project Planner P3 Version 3.1 Revised 2006

Chapter 3: Creating Projects And Setting Up The Software

Overview

This chapter covers the following topics:

  • P3.ini file

  • Understanding the P3 file structure

  • Creating new projects

  • Opening project files

  • Understanding the screen and

  • Customizing the screen.

3.1 P3.ini File and Setting the Default Start Up Directory

The P3.ini file is a file that resides in the WINDOWS or WINNT subdirectory and sets the software defaults. More modern software uses the registry but P3 is a 16 bit software and still uses an ini file.

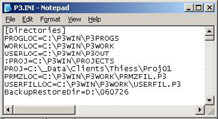
There are many options that may be manually set by editing the P3.ini file but one of the more useful ones is the ability to set the start up directory. This is the default directory that the software displays when using functions such as File, Open. To change the default directory:

  • Find the P3.ini file in the WINDOWS or WINNT directory and make a copy of the P3.ini file, just in case you make an error and then the copied file may be re-established to get P3 working again.

  • Open the P3.ini file with a text editor such as Notepad and look for the section titled [Directories].

  • Edit the PROJ= line so that the line path is the path of your P3 files.

  • A : in front of a line makes this line inactive and therefore multiple locations may be saved in a P3.ini file and turned on or off by deleting or adding : as required.

In the picture able the PROJ=C:\P3WIN\PROJECTS location is disabled and PROJ=C:\_Data\Clients is the default...

UNLIMITED FREE
ACCESS
TO THE WORLD'S BEST IDEAS

SUBMIT
Already a GlobalSpec user? Log in.

This is embarrasing...

An error occurred while processing the form. Please try again in a few minutes.

Customize Your GlobalSpec Experience

Category: Web Browsers
Finish!
Privacy Policy

This is embarrasing...

An error occurred while processing the form. Please try again in a few minutes.