Adobe Photoshop CS2 A - Z: Tools and Features Illustrated Ready Reference
Curves Cutout filter

Curves

  • Menu: lmage>Adjustments>Curves

  • Shortcut: Ctrl/Cmd M

  • Version: 6.0, 7.0, CS, CS2

  • See also: Levels command, Shadow/Highlight

Curves is an advanced tonal control that is a favorite with experienced users and offers the most accurate contrast, color and brightness adjustments of any Photoshop feature.

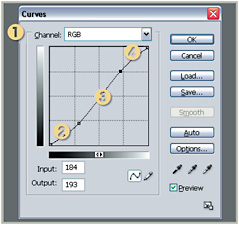
Its dialog (1) has a graph with vertical and horizontal scales representing input and output brightness. When you first open this you ll see a straight line running through the graph at 45 from the bottom left to the top right.

The bottom left represents the shadow area (2), top right is highlights (4) and the midpoint is midtones (3). You can drag the line by clicking on it and holding down as you move the mouse. Moving the midpoint up has a lightening effect (5) and down darkens the image. Use the Eyedropper tool and Ctrl/Cmd click anywhere on the image and its brightness value will appear as a point on the line. You can then move this point up or down to darken or lighten that part of the image. The picture will look natural, providing you create either a straight line or an arc. The best results are usually achieved with a very shallow S-shaped curve (6), and is the reason why it s called Curves. The usual Curve to make is a slight downward direction of the 3/4 shadow areas and a slight upward movement of the first quarter highlight areas, creating a very gentle S shape.

UNLIMITED FREE
ACCESS
TO THE WORLD'S BEST IDEAS

SUBMIT
Already a GlobalSpec user? Log in.

This is embarrasing...

An error occurred while processing the form. Please try again in a few minutes.

Customize Your GlobalSpec Experience

Category: Signal Conditioners
Finish!
Privacy Policy

This is embarrasing...

An error occurred while processing the form. Please try again in a few minutes.