Beginning AutoCAD 2006

Placing emphasis on learning by doing, this step-by-step guide provides a detailed exploration of AutoCAD functions required at each stage of producing a 2D drawing.
We will now create a drawing which will be used to investigate several new topics, e.g. using the modify commands, adding text and dimensions, etc. This working drawing will be created from lines and circles and is relatively easy to complete, so:
Open your A3PAPER standard file drawing or template.
Refer to Figure 11.1 and:
draw full size the component given
ensure that layer OUT is current
a start point is given USE THIS START POINT AS IT IS IMPORTANT FOR FUTURE WORK
do not attempt to add the dimensions
use any entry method suitable but I would suggest:
absolute co-ordinates for the (80,110) start point then relative co-ordinates for the outline
absolute co-ordinates for the circle centres (some 'sums' needed).
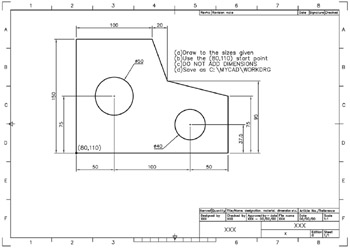
Figure 11.1: Creating the working drawing C:\MYCAD\WORKDRG.
When the drawing is complete, menu bar with File-Save As and:
| prompt | Save Drawing As dialogue box |
| with | File name: A3PAPER |
| respond |
|
We have now opened our A3PAPER file (drawing or template), completed a drawing exercise and saved this drawing with a different name to that which was opened.
This is (at present) the method which will be used to complete all new drawing exercises.
Now continue to the next chapter.
Note: It should be apparent that the circles will be drawn without centre lines. This is deliberate, as it will allow us to investigate other CAD draughting...