Beginning AutoCAD 2006

Placing emphasis on learning by doing, this step-by-step guide provides a detailed exploration of AutoCAD functions required at each stage of producing a 2D drawing.
AutoCAD 2006 allows the user to add four 'types' of hatching:
predefined, i.e. AutoCAD's stored hatch patterns
user-defined
custom not considered in this book
gradient.
When applying hatching (section detail) the user has two methods of defining the hatch pattern boundary:
by selecting objects which make the boundary
by picking a point within the boundary.
Hatch terminology includes:
Boundary: the objects (lines, circles, arcs, etc.) which define the area to be hatched
Pattern: the appearance of the hatching
Island: an enclosed area within an existing hatch boundary
Associativity: when the hatch area is altered, the hatching will 'fill the new area'.
The hatch command can be activated from the command line, menu bar or icon selection. In this chapter we will only consider the menu bar and icon methods. The user can investigate HATCH at the command line for themselves.
Open the A3PAPER standard sheet and draw a 50-unit square on layer OUT, then multiple copy it to several other parts of the screen.
Refer to Figure 18.1 and add the other lines within the required squares (any size).
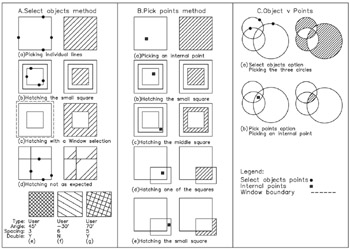
Figure 18.1: User-defined hatching. Both select objects and pick points methods.
Note that I have included additional squares to indicate appropriate object selection and to demonstrate the before and after effect.
Make layer SECT current.
Menu bar with Draw-Hatch and:
| prompt | Hatch and Gradient dialogue box |
| with | two tab selections:
|